

What is a VPN?
A Virtual Private Network, or VPN, is a private communication network configured over a public network. It is a way to connect two distinct points through a public network (the internet, for example), instead of using an infrastructure of dedicated links or a packet network. Thanks to this solution, it is possible to transfer information/files in an encrypted, fast, and secure way.
Required knowledge
Prior knowledge of the following topics is recommended, though not required:
Remote connection to Linux/Windows servers; DNS concepts; Certificate management via AWS ACM;
Prerequisites
To create an AWS Client VPN you need:
The necessary permissions to work with AWS Client VPN endpoints; A VPC with at least one subnet, an internet gateway, and a route to the internet gateway; A version of the AWS CLI installed on the workstation; The OpenVPN tool installed on the workstation (Linux Ubuntu); The AWS Client VPN tool (Windows and MAC); The Putty tool (to connect to Linux servers); Check whether the AWS Client and its dependencies are available for your working region;
Step 1: Keys and Certificates
To generate the certificates you need to create an OpenSSL Easy-RSA. On Linux workstations we can access it through the following command: git clone https://github.com/OpenVPN/easy-rsa.git
Then open the folder of the downloaded files: cd easy-rsa/easyrsa3
For Windows workstations, a version higher than the one provided above (3.0) is required; for this step-by-step guide we used Easy-rsa 3.0.7. After downloading the file, unzip it and start the “EasyRSA-Start.bat”;
Initialize a new PKI environment: ./easyrsa init-pki
Create a domain certificate: ./easyrsa build-ca nopass You will be asked to enter a value, where we can enter “vpn.client.domain” for example, to make it easier to recognize later;
Command to generate the certificate and key that will be tied to the server we want to access: ./easyrsa build-server-full ServerName nopass
Command to generate the certificate and key for the client: ./easyrsa build-client-full Client.domain nopass
NOTE: It is a convention, and considered a best practice, to create individual keys for each user, since this makes it easier to control employee access in case of reassignment or termination (example: user.client.domain).
Now copy the files into a single folder for better control: mkdir ~/newFolder/ cp pki/ca.crt ~/newFolder/ cp pki/issued/ServerName.crt ~/newFolder/ cp pki/private/ServerName.key ~/newFolder/ cp pki/issued/Client.domain.crt ~/newFolder/ cp pki/private/Client.domain.key ~/newFolder/
Check whether all files are in the folder: cd ~/newFolder/ ls
Step 2: Importing the certificates
To import the server certificate into the AWS Management Console, enter the following command: aws acm import-certificate –certificate file://ServerName.crt –private-key file://ServerName.key –certificate-chain file://ca.crt –region desiredRegion
Then import the Client certificate that was generated.
Note: If there is a need to import into multiple regions, you will need to import one at a time.
It is possible to perform the import through the AWS Management Console
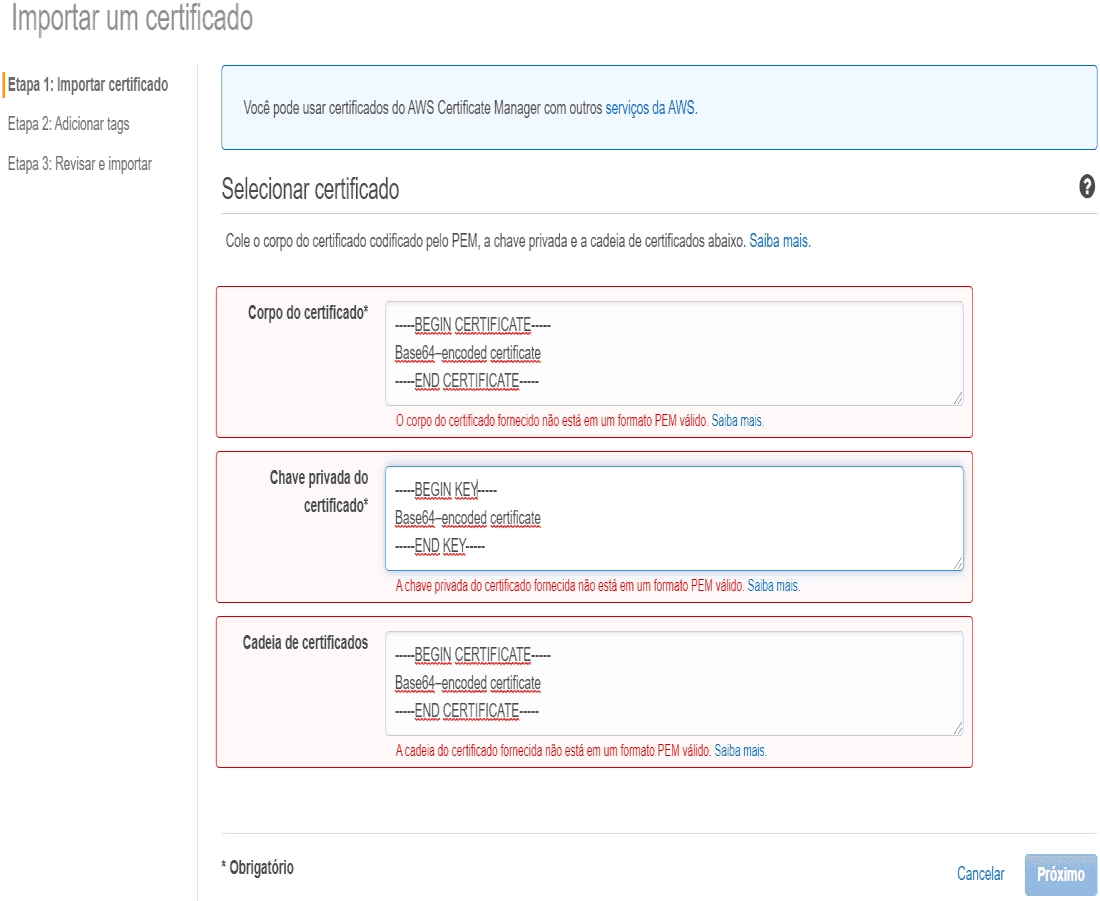
Note: If the Client certificates were issued by different CAs, they must also be imported.
In the Management Console, go to Client VPN Endpoints, located within VPC.
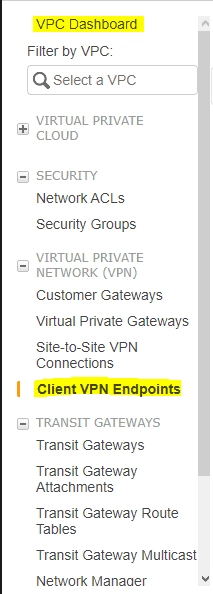
Select Create Client VPN Endpoint:

The first block of information refers to the identification of the VPN network.
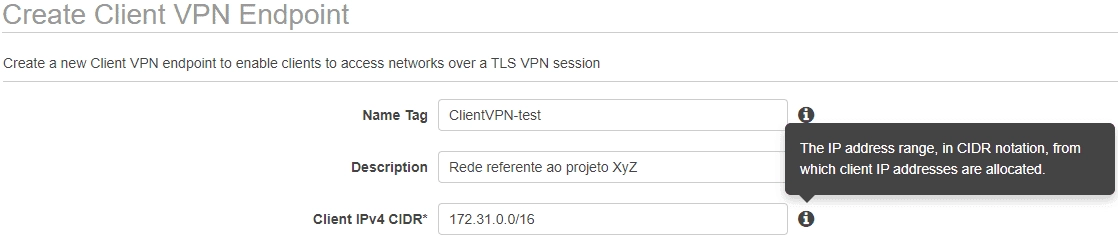
To fill in the Client IPv4 CIDR field, the network must be at least /22 and at most /12. If you have any questions, you can calculate this value with a subnet calculator.
NOTE: The Client IPv4 CIDR field refers to the block of IPs on which users will connect to the network; do not use the same network as your VPC, otherwise it could impact your environment. This information cannot be changed after creation.
The second block refers to server authentication.
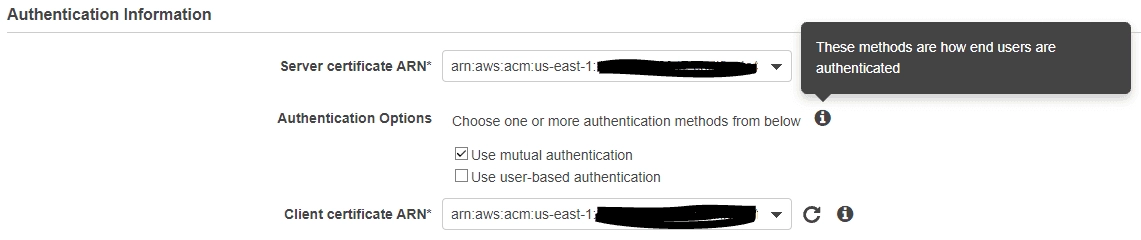
NOTE: In the Server certificate ARN field, you must select the server certificate generated in Step 1. In the Authentication Options field, select Use mutual authentication and then select the client certificate also generated in Step 1.
The third block refers to log creation.

NOTE: It is highly recommended, and considered a best practice, to enable the log configuration, since it will record every time there is an authentication attempt to the network.
The fourth block refers to additional settings.
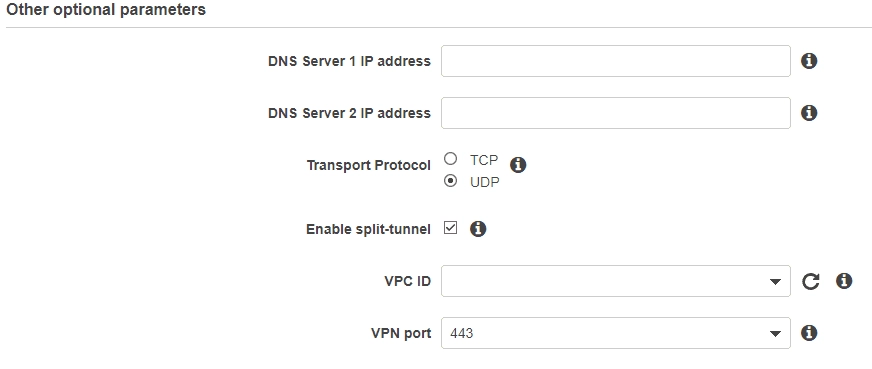
NOTE: In this block you can configure the DNS servers for name resolution within the network, choose the transfer protocol (UDP being the one selected by default), and enable Split-tunnel (allowing the use of the normal network for applications and services that are not destined for servers within the VPC).
After completing all the settings, simply select the Create Client VPN Endpoint button.
Step 4: Enabling VPN connectivity for Clients
On the Client VPN Endpoints page of the Management Console, select the Associations option and then Associate, as shown in the figure below.
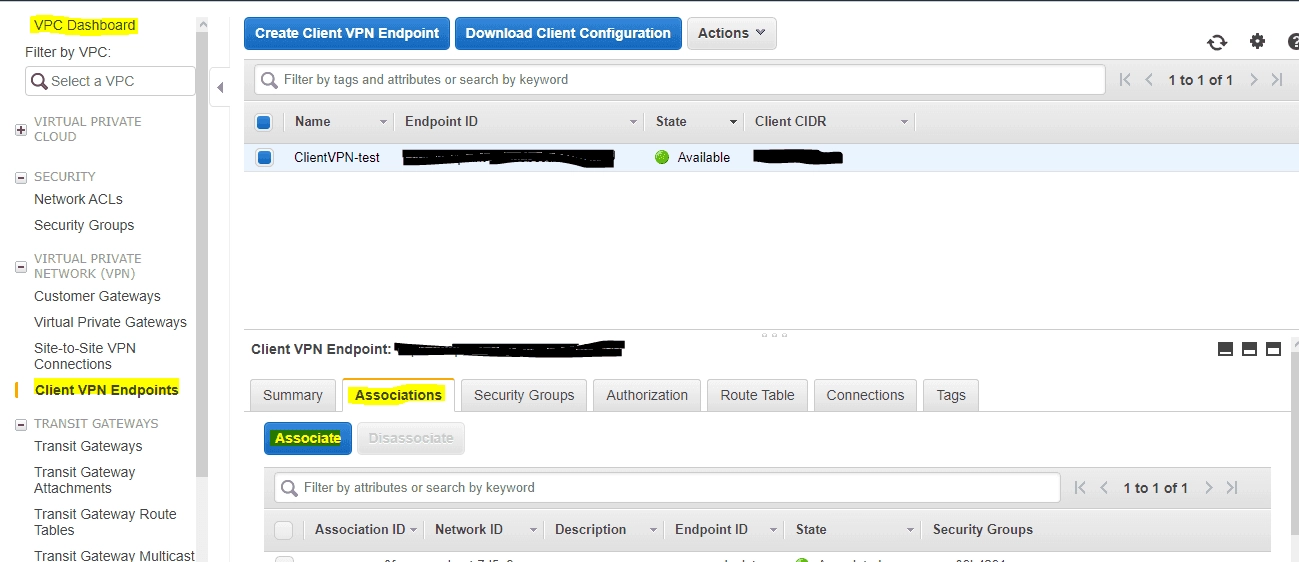
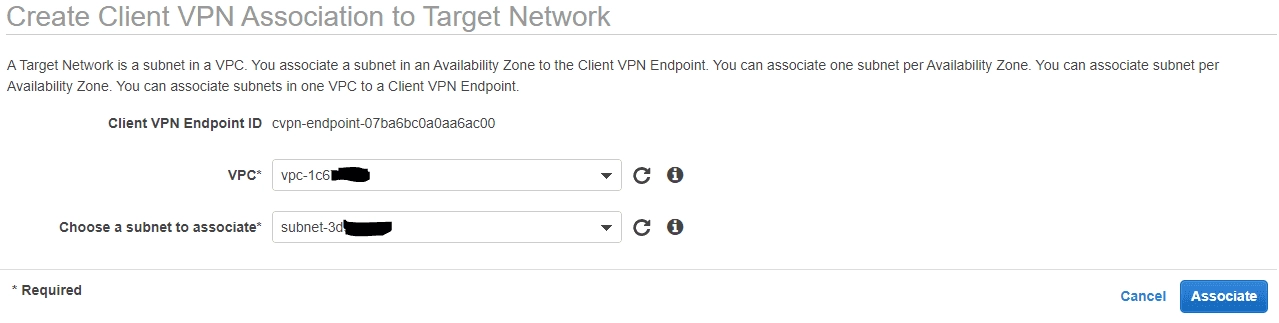
On this screen you need to create the association with the desired VPC and its respective Subnet of the desired network.
Step 5: Authorizing connectivity with the client
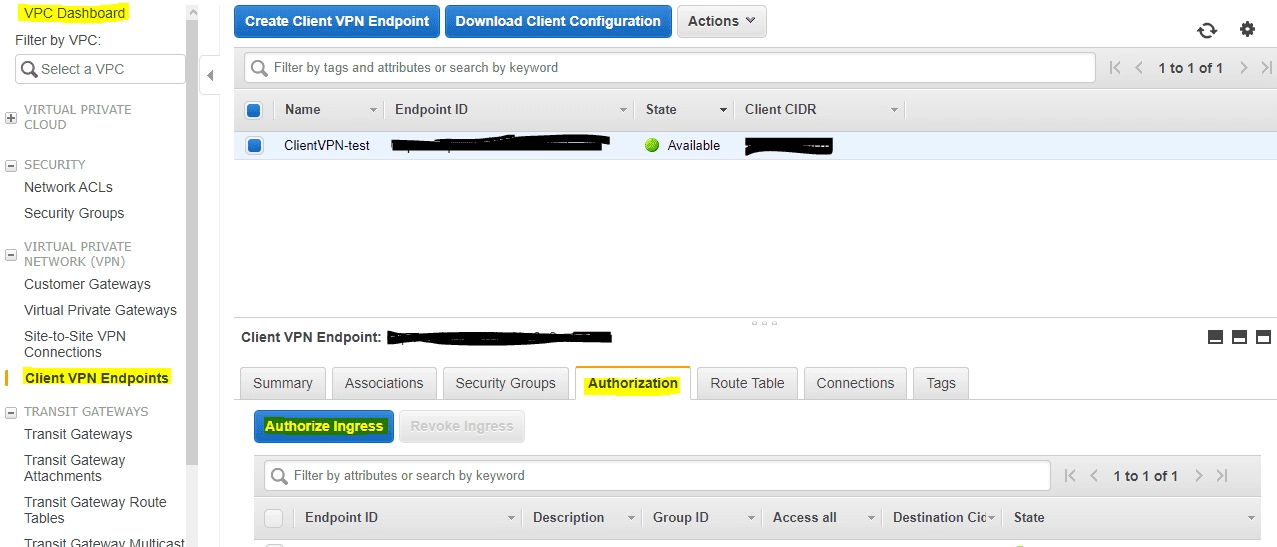
On the Client VPN Endpoints page of the Management Console, select the Authorization option and then Authorize Ingress, as shown in the figure below.
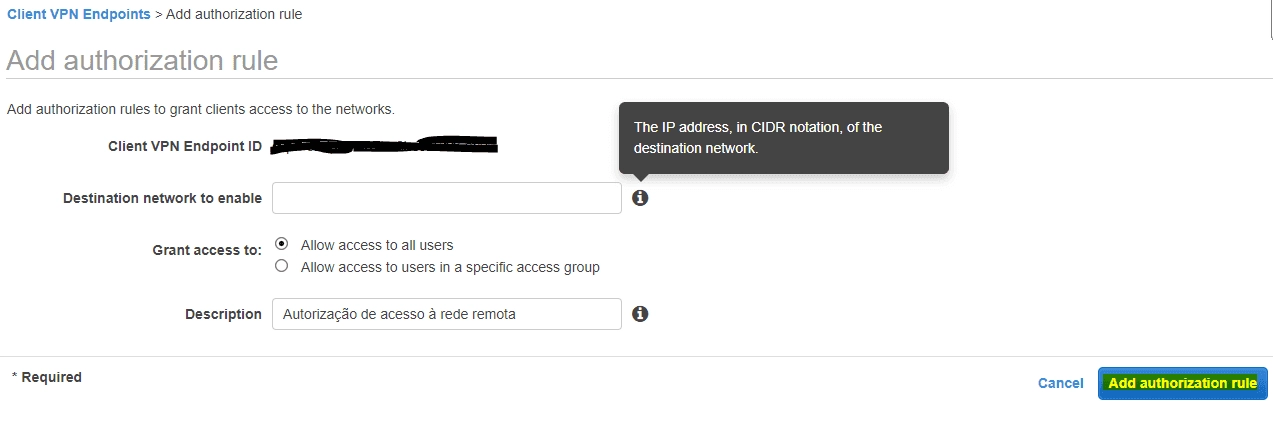
On this screen, in the Destination network to enable field, you configure the network, in CIDR notation, that will be accessed by the VPN. At the end of the configuration, just click Add authorization rule.
Step 6: Endpoint Configuration File
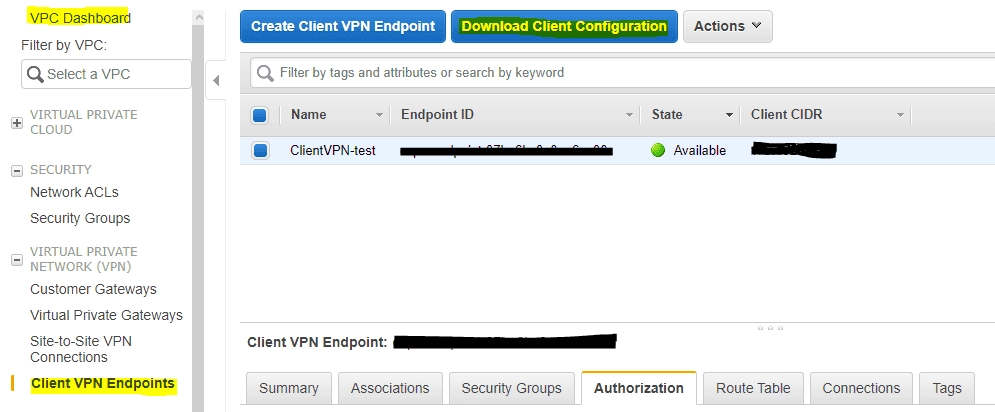
To download the client Configuration file, just go to the Client VPN Endpoints page of the Management Console and select the Download Client Configuration option, as shown in the figure below.
An .ovpn file will be downloaded with the following content:
client dev tun proto udp remote cvpn-endpoint-…region.amazonaws.com 443 remote-random-hostname resolv-retry infinite nobind persist-key persist-tun remote-cert-tls server cipher AES-256-GCM verb 3 <ca> -----BEGIN CERTIFICATE----- Base64–encoded certificate -----END CERTIFICATE----- </ca> reneg-sec 0In this file you will need to insert the Server Certificate and the Client Key; this can be added in two ways:
Tag
You can insert the two keys through the tags:
client dev tun proto udp remote cvpn-endpoint-…region.amazonaws.com 443 remote-random-hostname resolv-retry infinite nobind persist-key persist-tun remote-cert-tls server cipher AES-256-GCM verb 3 <ca> -----BEGIN CERTIFICATE----- Base64–encoded certificate -----END CERTIFICATE----- </ca> **<cert> -----BEGIN CERTIFICATE----- Base64–encoded certificate -----END CERTIFICATE----- </cert> <key> -----BEGIN KEY----- Base64–encoded certificate -----END KEY----- </key>** reneg-sec 0Reference
You can insert the two keys by referencing the files within the document, as follows:
client dev tun proto udp remote cvpn-endpoint-…region.amazonaws.com 443 remote-random-hostname resolv-retry infinite nobind persist-key persist-tun remote-cert-tls server cipher AES-256-GCM verb 3 **cert ServerName.cert key ServerName.key** <ca> -----BEGIN CERTIFICATE----- Base64–encoded certificate -----END CERTIFICATE----- </ca> reneg-sec 0NOTE: When configuring via reference, you will need to send the certificate and the key along with the configuration file to the client.
Step 7: Distributing the file to the clients
With the configuration file finished, simply distribute it to the clients so they can access the VPN via AWS Client VPN. To connect to Linux servers, just use the Putty tool. To connect to Windows servers, just use the Remote Desktop Connection tool.
Step 8: Revoking the Client Certificate
If you are using Mutual Authentication and there is a need to revoke a certificate, open the pki environment and type:
./easyrsa revoke client-certificate-name
When prompted, type yes. A crl.pem file will be created in: /easy-rsa/EasyRSA-3.0.7/pkicrl.pem/crl.pem
In the VPC tab of the management console, select your Client VPN and click Import Client Certificate CRL.
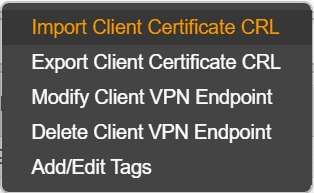
Fill in the field with the content of the crl.pem file and finally click Import CRL.
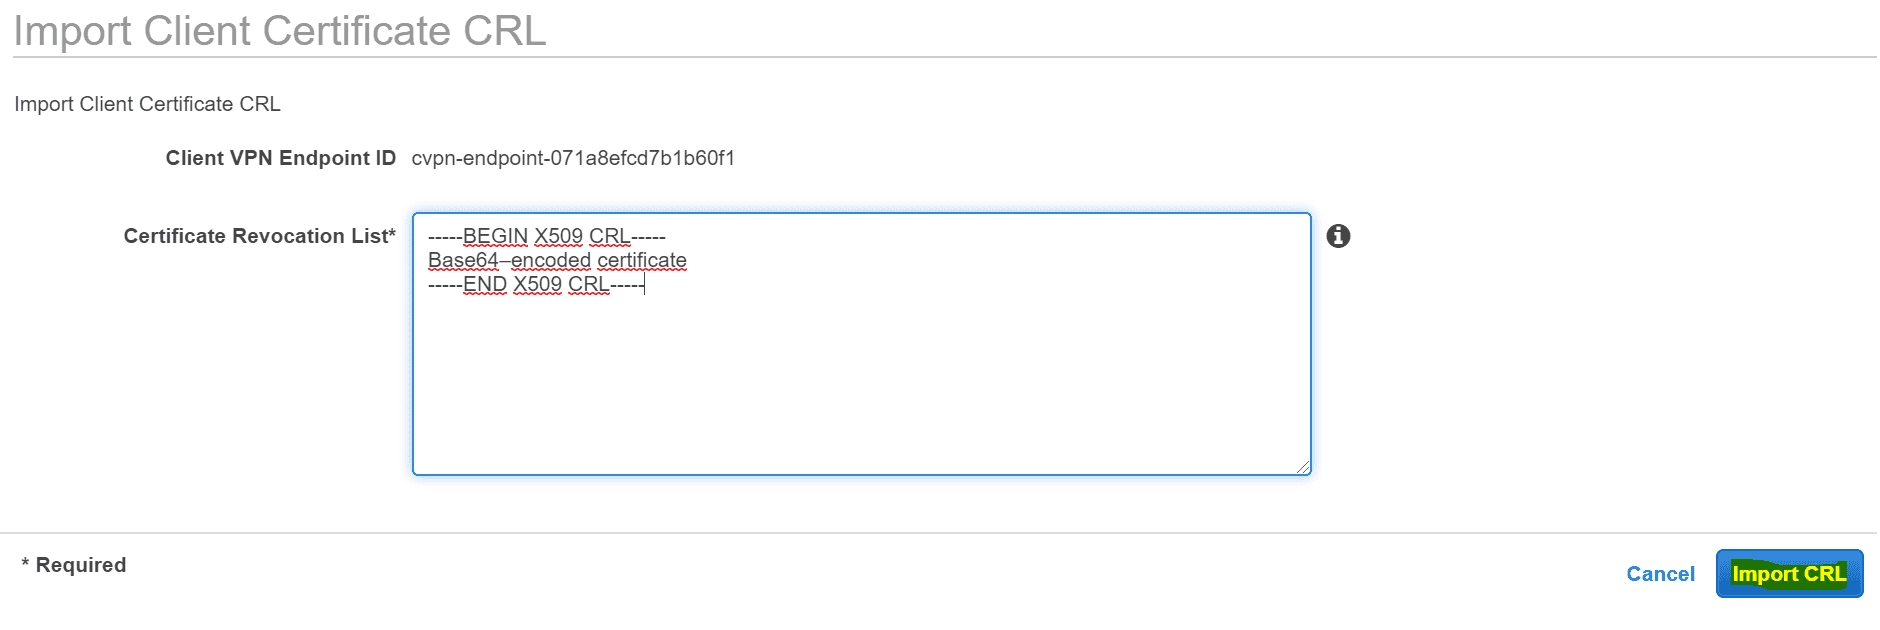
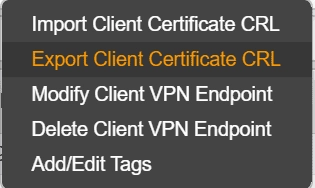
At any time you can export the list of revoked certificates.
Select your Client VPN and click Export Client Certificate CRL.
Availability and Pricing
The pricing of this tool works as follows (based on the Ohio region):
Creating an AWS Client VPN endpoint association incurs a charge of USD 0.10 per hour; Each AWS Client VPN connection incurs a charge of USD 0.05 per hour. For more information about the availability regions and their respective charges, check here.
Summary
In this article we configured a private network using AWS Client VPN, issued the authentication certificates, and created a configuration file to connect to our servers.
