


Testing Alone and Adopting Company-Wide Are 2 Different Moments
A developer on your team can open a personal account and try Kiro without asking anyone for permission. That works for one person evaluating the tool, but it doesn’t scale to the whole team: without a formal integration with the company’s AWS account, each developer pays out of pocket, with their own card, and no one on the infrastructure team has visibility into who is using what. Adopting Kiro company-wide solves exactly that, because the subscription moves to being managed through the AWS account, with sign-in through IAM Identity Center or the identity provider the company already uses, such as Okta or Microsoft Entra ID, instead of each person opening their own account.
The Full Integration Path
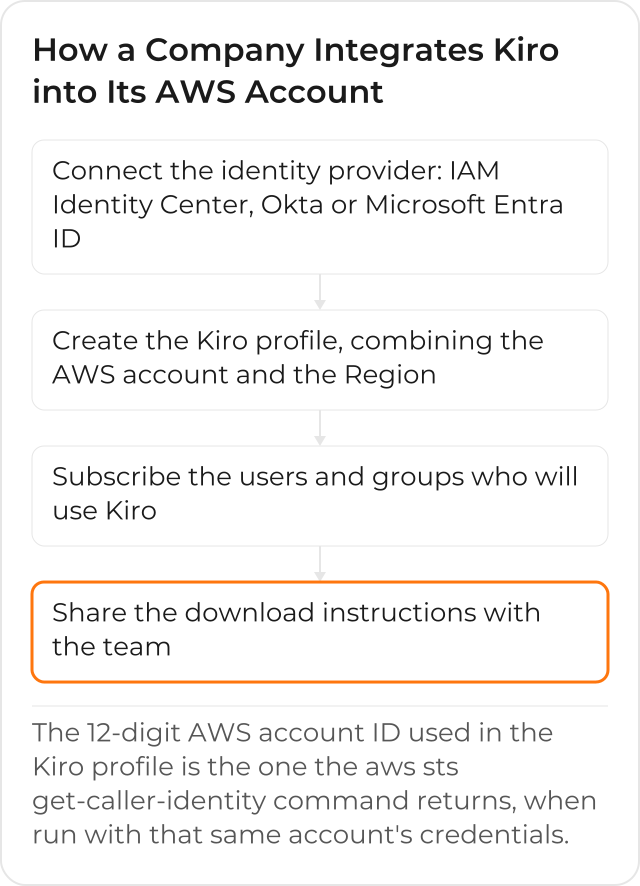
The official Kiro documentation for administrators describes the integration in the order below, starting with the identity provider: without it connected, there’s no way to choose who on the team gets access.
Step 1: Connect the Identity Provider
The first step is to connect Kiro to an identity provider, in 2 possible ways, according to the Kiro documentation on identity providers: through AWS IAM Identity Center, adding users directly to its directory or connecting it to an external provider; or connecting an external provider directly to Kiro, such as Okta or Microsoft Entra ID, without going through IAM Identity Center. This identity provider, in either option, decides who exists as a user, before any Kiro subscription comes into play.
Step 2: Create the Kiro Profile in the AWS Account
With the identity provider connected, the next step is to create a Kiro profile inside the AWS console. A Kiro profile corresponds to a combination of an AWS account, management or member, with that account’s Region: the company can only have one profile per account in each Region, and it’s inside this profile that the whole team’s subscriptions are configured.
Which Account and Which Region to Choose
The profile’s AWS account can be an organization’s management account or a member account, and the choice usually follows the same logic the company already applies to other services: a dedicated account for the platform or team administering Kiro, instead of mixing the configuration with an application’s production account. The Region matters for a concrete reason, according to the Kiro concepts documentation: it’s where the profile’s own data is stored, while identities and subscriptions, when the company uses IAM Identity Center, are stored in the Region of the connected instance, which can differ, if the company chose separate Regions for each thing.
Step 3: Subscribe the Users and Groups
Once the profile is created, it’s time to subscribe who will use Kiro: individual users or entire groups from the directory connected in step 1, whether that’s IAM Identity Center or the external provider connected directly. The subscription follows that same directory, so adding or removing someone’s Kiro access is a matter of managing the right group, not opening a separate record in a third-party tool.
Step 4: Share the Access Instructions
With the users subscribed, the last step is to let the team know: each person downloads Kiro IDE or Kiro CLI from the official downloads page and signs in with their own identity provider credential, without needing to create a new personal account.
Where to Find the AWS Account ID the Profile Will Use
The Kiro profile lives in the account the administrator signed in to in the AWS console to create
it, according to the official Kiro documentation for
administrators, and it’s worth confirming
that account’s ID before moving on. When the IAM Identity Center instance uses a customer managed AWS
KMS key, the key’s policy asks for the <your-account-id> of the account that owns the Identity
Store, according to the Kiro documentation for this
provider. The most
direct way to get this number, with the right credentials loaded on the administrator’s machine,
is through the AWS CLI:
aws sts get-caller-identity --query Account --output textThis command is documented by AWS itself, on the page about finding your AWS account
ID: it
returns the account of the credentials in use, so it only shows the Kiro profile’s account ID when
run with the credentials of the account where that profile was created. With a named AWS CLI profile,
just add --profile <profile-name> at the end of the command.
IAM Identity Center’s Role
Integrating through IAM Identity Center has 3 prerequisites, according to the Kiro documentation for this provider: an IAM Identity Center instance already set up, in a Region Kiro supports, and administrator permission in AWS and, when there’s an external provider connected, in it too. Once the profile is created, 2 details are worth checking: when a new user joins a group that’s already subscribed, their access to Kiro can take up to 24 hours to take effect; and, if the IAM Identity Center instance uses a customer managed AWS KMS key, that key’s policy needs to allow Kiro before the subscription works.
Whoever Already Uses Amazon Q Developer Has a Shortcut
For the company that already managed Amazon Q Developer Pro subscriptions, the transition to Kiro has a direct shortcut: the Amazon Q Developer console becomes the Kiro console, with the same functionality underneath. The administrator doesn’t rebuild the configuration from scratch, because they manage subscriptions through the Kiro console, which is the renamed Amazon Q Developer console, while the team upgrades the extension and the CLI to the renamed version.
A Certified Partner’s Role in This Process
CloudDog, an AWS Advanced Partner, follows a 4-step adoption method for this type of integration: an initial team diagnosis, configuration and integration with the AWS account (including the identity provider), development team training, and assisted onboarding, with ongoing support after the first group is already using Kiro day to day. It’s the same method used for other service integrations in the client’s AWS account, adapted to what Kiro asks for in each of the 4 steps above. In practice, the difference between an integration led by a certified partner and one done without support shows up right in step 1: an identity provider configuration mistake there delays every step that follows, because no subscription works before the provider is set up right.
What Your IT Team’s Day-to-Day Looks Like After the Integration
Once the integration is in place, adding or removing someone’s Kiro access stops being a separate task: it follows the same identity flow the IT team already uses for other AWS services. Whoever leaves the company loses access through the same offboarding in the identity provider, with no separate license list to remember to update, and whoever joins gets Kiro the same way they get any other corporate access, inside the process the team already follows.
Learn about Amazon Kiro and how CloudDog deploys Kiro for your team with governance in your AWS account.
